Friday, December 28, 2018

MUESLI

Muesli in a large container that can stored in the fridge.
There are a variety of muesli recipes one can find. Some are based on oatmeal and others are non-grain and consist of nuts, seeds, coconut and dried fruit. The main difference between granola and muesli is that granola is baked. Granola also has wet ingredients added to it like honey, maple syrup, nut butter or egg whites. The wet ingredients add a coating, helps the crunch factor and in some cases makes it clump. I like the simplicity of muesli as it doesn't require baking. 

Muesli can be added to yogurt, milk and as a topping to a smoothie, hot oatmeal, applesauce or stewed rhubarb. There are many ways to eat muesli. It is also convenient to take to work for breakfast or have as a snack. I store muesli in a large jar (about one and half litres or six cups) in the fridge. When ready to eat, I shake the jar a few times in order to get a good mix as some of the spices or smaller seeds might have dropped towards the bottom of the container. I use about half a cup as a serving if adding to almond or coconut milk for breakfast. I let it sit for about 2 minutes before I start to eat it. Besides the ingredients provided here, you can add other things such as cardamom, ginger, apple pie spice, dried berries and other nuts or seeds. I like adding both carob nibs and chocolate chips to the mixture. 

After mixing in a large bowl.

INGREDIENTS:
2 1/2 cups of rolled old fashioned oats (not instant)
1/2 cup raw almonds (chopped if you want)
1/2 cup raw pecans (chopped if you want) 
1/4 cup flax seed
1/4 cup chia seeds
1/4 cup raw pumpkin seeds
1/4 cup raw sunflower seeds
1/4 cup carob nibs
1/4 cup chocolate chips 
1/4 cup shredded or flaked coconut
1/3 cup raisins
1/2 tsp cinnamon 
1/4 tsp nutmeg


DIRECTIONS:
Add all of the ingredients into a large mixing bowl. Mix well with a wooden spoon or spatula. Transfer to a large jar for storage. I use a measuring cup to transfer the muesli to the large jar so that I don't make a mess. If using within two weeks it can stay in a kitchen cupboard; otherwise store in the fridge. I keep the jar in the fridge.  

Recipe adapted from heathermcclees.com

Sunday, December 16, 2018

LEMON POPPYSEED SOURDOUGH BRIOCHE BREAD


Several weeks ago I made a sourdough brioche bread. I got the recipe from a friend who also likes to make bread. Last week I had a craving for lemon poppyseed and thought about making a dessert style loaf. I thought about other options of which one was using the sourdough brioche bread recipe and adding lemon juice and zest and poppyseed to the basic recipe. This brioche bread recipe is what I would call a french style egg bread and you could create other kinds of bread based on the basic recipe. For example you could add chocolate chips/chocolate shavings, raisins, dried cranberries, shredded cheddar, chopped walnuts/pecans or herbs to the basic dough batter. What you need to think about is the quantity to add.

To make the sourdough brioche bread (basic recipe) into a lemon poppyseed bread, I added the following to the batter before the kneading started:

2 tbsp poppyseed
3 tbsp lemon juice
zest from one lemon

When I made the basic sourdough brioche bread I used three small baking loaf tins. This time round I used two large ones. I also let it rise for the second rise in the bread pans for over 2.5 hours. The bread turned out great and we both really liked the flavour.

The dough did a nice rise after one hour. 

Egg wash applied and now ready for the second rising.


Second egg wash applied and now going into the oven.

The results at the end.


I couldn't help myself. Butter from grass fed cows.


Saturday, December 1, 2018

CASSAVA CHEESY MINI BREAD ROLLS

Amongst the nutrition and recipe books collected on the years, we have the Plant Paradox and the Plant Paradox Cookbook. The DH has been interested in several recipes from both books and asked that I make this one. The recipe is modelled on a Brazilian cheesy bread Pao de Queijo. I have never tried this Brazilian bread but it looked delicious in the cookbook. The recipe has six ingredients and is based on cassava flour. I weighed the amount of cassava flour versus using a measuring cup. To create the cheese flavour you can use either Parmigiano cheese or nutritional yeast. You can make the recipe vegan if you use flax eggs. I used one and a quarter cups of Parmaigiano cheese. One cup would have been sufficient. 


The directions to make the dough requires a bit of mixing and calls for a stand mixer or a food processor that has a paddle. If I had to mix this recipe by hand, it would require 10 to 15 minutes of vigorous beating by hand. Personally I find using a stand mixer much easer. Be prepared for an irresistible cheesy bread aroma wafting from the oven while the bread rolls bake. I used a one and three-quarter inch cookie dough scooper to scoop the dough out of the bowl and bake them into small balls. If you use a tablespoon or a small ice cream scooper, you may need to dip the utensil into a bowl of water between scoops to keep the dough from sticking. The dough didn't stick using a cookie dough scooper. Cassava flour when baked is not the same as wheat flour. It is more moist inside and not as dry as wheat bread roll. The bread rolls taste good and the DH likes them. Next time I make them I would add a bit of dried dill or basil to the dough batter.

Dough cooling in the saucepan.
Eggs being added to the dough.

All ingredients have been added and mixed and now ready to be scooped onto the baking sheets.

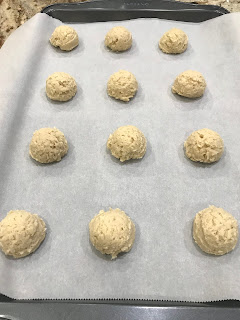
Scooped onto the parchment paper.
Cooling off on a rack.
Close up.
INGREDIENTS:
1 cup of milk or almond or coconut milk
1/2 cup avocado oil
1 tsp salt
10 ounces (about 2 cups) cassava flour
2 large eggs or vegan eggs
1 to 1.5 cups grated Parmigiano-Reggiano or 1 cup nutritional yeast

DIRECTIONS:

1. Preheat the oven to 450 degrees F. You will need to use two baking sheets so you may have to adjust your racks to fit both in the oven at the same time.

2. Line the two baking sheets with parchment paper or silicone baking mats.

3. Into a medium size saucepan, add the milk, oil and salt. Heat over medium heat, stirring occasionally with a mixing spoon. Remove from the burner when big bubbles start to appear as the mixture is starting to boil.

4. Add the cassava flour to the saucepan and stir with a mixing spoon until it is well combined and it looks like dough. Let it sit for a few minutes so that it starts to cool off.

5. Transfer the dough into a bowl of a standup mix (eg mixmaster) fitted with a paddle attachment. Beat the dough for a few minutes on medium speed until it appears smooth and it cool enough to handle. 

6. Keeping the mixer on medium speed, add the eggs into the cooled mixture one at a time. Wait until the first egg is incorporated into the batter before adding the second. You will need to stop the mixer from time to time to scrape down the dough on the sides of the mixing bowl. Mix for a minute to two minutes.

7. If using cheese, beat it in on medium speed and make sure it is incorporated through the dough. You may have to scrape down the sides of the bowl if the dough is sticking to the sides. The dough will be soft and stretchy and a bit sticky.

8. Using a cookie scooper or another favourite scooper, scoop the dough out of the bowl and place onto the parchment paper. The dough will rise a little bit while baking so space out the scoops between the two baking sheets.  

9. Place the baking sheets in the oven and reduce the heat to 350 degrees F. Bake for 15 minutes, then rotate the baking sheets. Bake for an additional 10 to 15 minutes until the buns are golden. Remove from the oven and cool for a few minutes before serving or sampling. Makes 24 to 28 buns. 

Adapted from the Plant Paradox Cookbook by Steven Gundry.