Sunday, September 2, 2018

SIMPLE GRANOLA

The easiest way to describe the differences between granola and muesli is that granola is baked. I hadn't thought about that until I started to research different recipes. I make both of them and my muesli tends to include nuts and coconut. You can add chopped raw nuts to the granola recipe and decrease the amount of seeds or even just add the nuts. Anything goes when making granola. If you don't want to add quinoa you can just increase the rolled oats by one cup.

When I made this recipe, I absently added the raisins into the mixture before baking it. Once I realized what I did and knowing that baking the raisins for that long would dry them out and make them tough to chew, I picked out by hand the cup of raisins I added. It was a bit like searching for gold. I did add the beaten egg whites to the granola. I am not sure how much of a difference it made in being more crunchy. I baked the granola closer to 50 minutes and I was diligent about stirring the mixture while it was baking. I like the addition of chocolate chips as it gives it a bit more sweetness and I never refuse chocolate. It is a great recipe to make and one that will be a staple in my kitchen.

Granola cooled and with added raisins and chocolate chips.
Breakfast: Cottage cheese, prune plume, raspberries and granola.

INGREDIENTS:

5 cups rolled oats (not instant)
1 cup quinoa
1 cup mix of hulled raw seeds such as sunflower, pumpkin, sesame, flax
1 tsp cinnamon 
1/2 tsp salt
1/2 cup honey or maple syrup
2 tbsp olive oil

Option: 2 egg whites beaten until frothy

1 cup raisins or other chopped dried fruit 
1/2 cup chocolate chips

DIRECTIONS:

1. Heat the oven to 350 degrees F. 
2. In a large mixing bowl, combine all of the dry ingredients except for the raisins. Mix well.
3. Drizzle the honey or maple syrup and oil over the mixture and mix well. You can add more sweetener if desired.
4. If you want a crunchier granola, add the beaten egg whites to the granola mixture and stir them into the mixture. 
5. Add the mixture to a large rimmed baking sheet. I lined my sheet with parchment paper. 
6. Bake for 35 to 45 minutes and stir every 15 minutes so that the granola is toasted evenly. Watch so that it doesn't start to burn. 
7. Remove the pan from the oven and add the raisins. Stir.
8. Once it cools, add the chocolate chips and mix. I added a generous 1/2 cup of chips.
9. Store in a large container in the fridge. Keeps for several months. Makes about 8 cups. 

Modified from 'How to Bake Everything' by Mark Bittman

Saturday, August 25, 2018

STARTER AND SOURDOUGH BREAD

I have been buying wonderful sourdough bread from a local small company on a regular basis. I find that eating sourdough bread is easier on the GI system than regular bread. I have always liked making bread and it has been years since I have made my own starter. I would make a 24 hour sponge but that is not the same as using a sourdough starter. I had the opportunity to get some well established starter and I knew that this starter made great sourdough bread as I had sampled the bread. I traded garden basil and parsley for a generous cup of sourdough starter. 

In looking at several bread making cookbooks and the internet, I came across a website from cultured food life that I quite like. It has good explanations on starting, using and maintaining your starter and a recipe for an overnight sourdough bread. I got the starter yesterday and thought why wait, let's make bread. Last night I started the process for overnight sourdough bread. I baked it early this morning. I have provided the link here to the website as the explanations are wonderful. I followed the directions and also the recommendation to weigh your ingredients. I used unbleached flour. I plan to use some of the sourdough starter for pizza dough and other baking goodies. Some people give names to their starter as they feed and maintain their starter for years. I haven't thought of a name just yet. 

Here are some photos showing the process. The bread turned out airy, not dense and it has a good chew. I have tested it already as I had the heel for breakfast with almond butter and jam and a toasted slice at lunchtime with some melted Swiss cheese, garden tomato and garden cucumber. The DH has also done some taste testing.


Starter in a glass jar, mixing some of the starter with warm water and mixing the flour into the dough.

Dough has been mixed and rose overnight. It rests for 30-60 minutes in a flour coated dish towel before it is baked.

Dough is nestled in parchment paper that is placed in an Emile Henry pot and baked.  Ready for sampling after it cools for 25 to 30 minutes.


Thursday, July 26, 2018

BLUEBERRY LEMON PALEO MUFFINS

In thinking about making muffins today, I thought about the various flours I use in cooking and baking. I have a variety of flours on hand and most of them I keep in the fridge. I did wonder about coconut flour as I have been keeping coconut flour in the fridge and was curious if it was necessary. From reading various posts on the internet I will keep it in the fridge. I buy a big bag of almond flour from Costco and have kept that in a cupboard where I keep dry goods. I use it fairly frequently and it is kept in quite a sturdy bag. For now I have decided to keep it in the cupboard which is a dark and located in a cool spot. 

With all of the fresh blueberries available it is an opportune time to make blueberry muffins. This recipe from paleorunningmomma included ingredients I had on hand so I decided to make it.  I made a few modifications to the original recipe. I used coconut milk in the cartoon as it is more handy and I don't cook enough with canned coconut milk to warrant having leftovers in the fridge. If you use canned coconut milk, shake the can really well before opening it. I also used liquid coconut oil instead of melting coconut oil. I do have coconut oil in the plastic container but decided to use some of the MCT oil I have on hand. The directions call for using a hand mixer or other mixing gadgets. You can make these muffins without a hand mixer and using a whisk will work just as well. For a muffin tin I like to use one made with silicon as it doesn't require muffin tin paper liners. 

Messy silicon muffin tin that I used to make the muffins.
Muffins cooling in the pan.

Ready for sampling.


INGREDIENTS:

4 large eggs
1/2 cup full fat canned coconut milk or coconut milk in the cartoon
6 tbsp honey, maple syrup or stevia
3 tbsp coconut oil, melted and cooled
1/4 cup lemon juice
zest from a small lemon (optional)
1 tsp vanilla extract

2/3 cup coconut flour
1/4 cup tapioca flour
1 tsp baking soda
1/8 tsp salt

3/4 -1 cup of fresh blueberries (can use frozen blueberries that are thawed)

DIRECTIONS:

Preheat the oven to 350 degrees F. If using a metal or non-stick muffin tin, line the cups with muffin tin paper liners. 

In a large bowl that can accommodate a hand mixer or using a mixmaster (I used a mixmaster in mixing these muffins), add the eggs and blend them until they are mixed. Add the coconut milk, honey or other sweetener, coconut oil, lemon juice, zest and vanilla extract to the bowl with the beaten eggs and mix well. 

In a separate medium size bowl, add all of the dry ingredients and mix well. Slowly add the dry ingredients to the wet ingredients using low speed until combined. The batter will be thick because of the coconut and tapioca flours. Add the blueberries and fold into the batter using a mixing spoon. 

Using a large spoon, add the batter to each of the lined muffin cups filling it to about 3/4 full. Bake for 20 to 25 minutes. I had the oven on convection and took the muffins out after 20 minutes. Let the muffins cool in the muffin tin for about five minutes and then remove each muffin and transfer them to a cooling rack. Store in the fridge for three to four days and freeze any leftovers. Makes 12 muffins.

Adapted from paleorunningmomma.com

Sunday, July 15, 2018

PALEO UPSIDE DOWN RHUBARB CAKE

With two healthy rhubarb plants in the garden, I decided to make a big dent in the stalks that were ready to be eaten and pulled out many stalks this morning. I pulled out enough that I had 11 cups of chopped rhubarb. I froze four bags each with two cups of chopped rhubarb and used the last three cups to make a cake. 

Three years ago I posted a recipe for upside down rhubarb cake. It is still a great recipe and I decided to update it to make it paleo. This is a favourite recipe of the DH (he has many favourites) and he asked if I would make it again. The change that I made was to make a paleo cake batter. I used a coffee cake recipe with a few small modifications from paleorunningmomma.com and the same rhubarb topping and directions from my original posted recipe. In the original post I also made subsequent upside down cakes and used other fruit besides rhubarb. 


In a number of coffee cake recipes, cinnamon is used and I decided to add cinnamon but in less quantity. I also wanted to use a white based sugar versus maple syrup or sugar or coconut sugar that many paleo cakes use as I didn't want the batter to be too dark. I used stevia to sweeten the batter and the rhubarb topping. 


Cake pan greased with butter and then sugar added.
Rhubarb topping placed over the sugar lined cake pan and then added the batter.

Out of the oven and cooling.


Inverted into a large glass quiche plate 


Ready to sample.

INGREDIENTS:


Topping:

3 cups rhubarb, chopped
1/4 cup strawberry or raspberry jam
1/4 cup sugar 
1 tbsp soft butter 

Batter:

2 cups ground almond flour
1/4 cup arrowroot flour
1/2 tsp baking soda
1 tsp cinnamon 
1/4 tsp salt

3 eggs, room temperature

1/4 cup coconut or almond milk
1 tbsp lemon juice
3 tbsp coconut oil, melted and room temperature 
2/3 cup sugar, eg stevia or coconut, or maple sugar
1 tsp vanilla extract


DIRECTIONS:


Slice the rhubarb into small pieces. Place in a medium-size bowl.

Preheat oven to 350 degrees F. Generously coat the bottom and side of a 9-inch round cake pan or a 10-inch deep-dish pie plate with 1 tbsp butter. 

Place jam in a small bowl and microwave for 25 to 30 seconds, until melted. Pour the jam over the rhubarb and stir to evenly coat. Evenly sprinkle 1/4 cup sugar over the bottom of the cake pan or pie plate. Spoon rhubarb mixture over the sugar and evenly spread it out.

In a medium bowl, combine the almond flour, arrowroot flour, baking soda, cinnamon and salt. Set aside.

In a large bowl, whisk the eggs and then add the milk, lemon juice, coconut oil, sugar and vanilla extract. Using a whisk or a mixing spoon combine well. Add the dry ingredients to the wet ingredients and mix well using a spatula or mixing spoon.

Spoon the batter over the rhubarb mixture in the cake pan and evenly spread the batter around. The batter will be thick. Bake in the oven for 28 to 30 minutes and cook until a toothpick inserted into the centre of the cake comes out dry. If the cake batter is browning too quickly, cover loosely with foil for the last five or so minutes. 

Cool the cake in the pan on a rack. Run a knife around edge of cake. Invert onto a large cake plate. It is best to wait until the cake cools down before you flip it onto a plate as you want the fruit topping to solidify. Serves 8 to 10 depending on serving sizes.

Cake batter adapted from paleorunningmomma.com

Monday, June 25, 2018

RHUBARB STRAWBERRY PALEO CRISP


Two healthy rhubarb plants are thriving in the garden. I picked quite a bit the other day and froze a bag with four cups of chopped rhubarb, gave some to a friend and used another four cups to make a crisp. I like rhubarb mixed with strawberries. As it is hot outside and not wanting to heat up the kitchen, I cooked the rhubarb on the bbq. I use the top rack above the burners so that the bottom doesn't burn before the crisp is cooked. If you don't have a top rack or what some call a warming rack, you can cook the crisp on the main grill with a few burners turned on and the crisp off to the side without the burner turned on right under the pan with the crisp. Last year I made several pies on the top rack and they turned out well. If the topping is browning too fast on the bbq, cover the pan with tin foil while the fruit cooks. I covered it after about 20 minutes of cooking.

I used honey in the topping and as it was more clumpy versus crumbly, I used my fingers to drop small clumps onto the fruit mixture. The crisp cooked for 50 minutes on the bbq and I had the temperature at about 400 degrees F. 

The consistency of the topping using honey.


Adding the topping to the fruit.

Ready for the bbq.

Cooking on the top rack.
Ready for sampling.


INGREDIENTS:

Fruit:

4 cups chopped rhubarb
2 cups sliced strawberries (fresh or frozen)
1 tbsp lemon juice
3/4 cup sugar or stevia (stevia for baking)
2 tbsp arrowroot powder or minute tapioca

Topping:
1/2 cup slivered almonds or chopped pecans
3/4 cup almond flour
2 tbsp coconut flour
1/4 cup honey or maple syrup
1 tsp cinnamon
1/4 cup coconut oil (at room temperature) or butter

DIRECTIONS:

Heat the oven to 350 degrees F. In a large bowl, add the fruit, lemon juice, sugar and arrowroot powder and mix well. In a separate bowl, mix together all of the topping except the coconut oil or butter. Add the oil or butter and mix using a fork or pastry blender so that it forms into crumbs or clumps. Using honey will make it form more like clumps. 

Grease with oil or butter a medium size baking pan. Add the fruit mixture, spread it evenly across the pan and add the topping to cover the fruit. Bake for at least 30 minutes or until it is bubbling and the topping has browned. Serves 6 to 8.  

Sunday, June 10, 2018

MILLET TABBOULEH SALAD

I like the combination of fresh dill, mint and parsley with lemon juice in a salad. I have eaten tabbouleh over the years and this recipe for tabbouleh is a bit different. It uses millet as the grain instead of bulgar wheat or couscous. Some tabbouleh recipes also include chopped tomatoes, onion and cucumber. Tabbouleh can be eaten as a side dish with chicken, fish or meat or eaten on its own as a salad. This recipe doesn't include a lot of dressing and if you like a 'juicier' salad, you can add more lemon juice, vinegar and oil.

Both the DH and I enjoyed this salad and have leftovers for another meal. We ate this salad with baked chicken thighs. 


Salad mixed and ready to serve.

INGREDIENTS:

2 cups cooked millet
1/2 cup chopped fresh parsley
1/2 cup chopped fresh mint
1/4 cup fresh dill
1 tbsp lemon juice
2 tbsp olive oil
1/4 cup red wine vinegar
salt and pepper to taste

DIRECTIONS:

If cooking the millet right before you make the tabbouleh, let it cool first. In a medium size bowl, mix the millet, herbs and dressing. Combine well. Add more lemon juice, vinegar and oil to taste if needed. Serves 4.

Adapted from "The Plant Paradox Cookbook"

Saturday, May 19, 2018

SLOW COOKED APPLES

Last fall one of my neighbours gave me a bag of apples from their backyard tree. I knew these apples were for cooking as they were softer apples. They came with a few spots as they were not sprayed which is great. These apples can be used in a variety of ways.

In talking to a friend, she suggested cooking these apples in a slow cooker and to cook them so that they are still in chunks and not pureed like apple sauce. She provided me with a recipe that she was going to use that she got from a friend. I tweaked the recipe and was able to cook the 20 apples. I used Splenda and not sugar in the recipe. The nice thing about this recipe is that you leave the skins on the apples so there is less work to prep them. The caramel syrup is the kind you use when making flavoured coffee drinks. I stirred the apples once they finished cooking to make them more like sauce than chunks. 

I froze some of these cooked apples in one or two cup portions and kept a container in the fridge to enjoy for the week. 


Apples placed in the slow cooker.

After the first hour of cooking.

After three hours of cooking.

Stirred it more to create a bit more puree than chunks. 

INGREDIENTS:

20 apples or enough to fill the crock of a slow cooker
1 to 2 tbsp cinnamon (I used 1 tbsp)
1 tsp nutmeg
dash of cardamom (optional)
2 tbsp sugar or Splenda
2 tbsp regular or sugar free caramel flavour syrup
3/4 cup of water

DIRECTIONS:

Core and cut into quarters or eights each apple. Place into the slow cooker. After all the apples have been placed into the crock, add the cinnamon, nutmeg, cardamom, sugar and syrup. Mix well. Add the water and stir. Set the slow cooker to high and cook for two hours. Reduce the heat to low for the third hour. Every half hour or so, stir the apples while they are cooking. If the apples require more cooking, keep cooking until you have the desired consistency. 

Saturday, May 5, 2018

CHERRY CRISP WITH A NUT DATE TOPPING

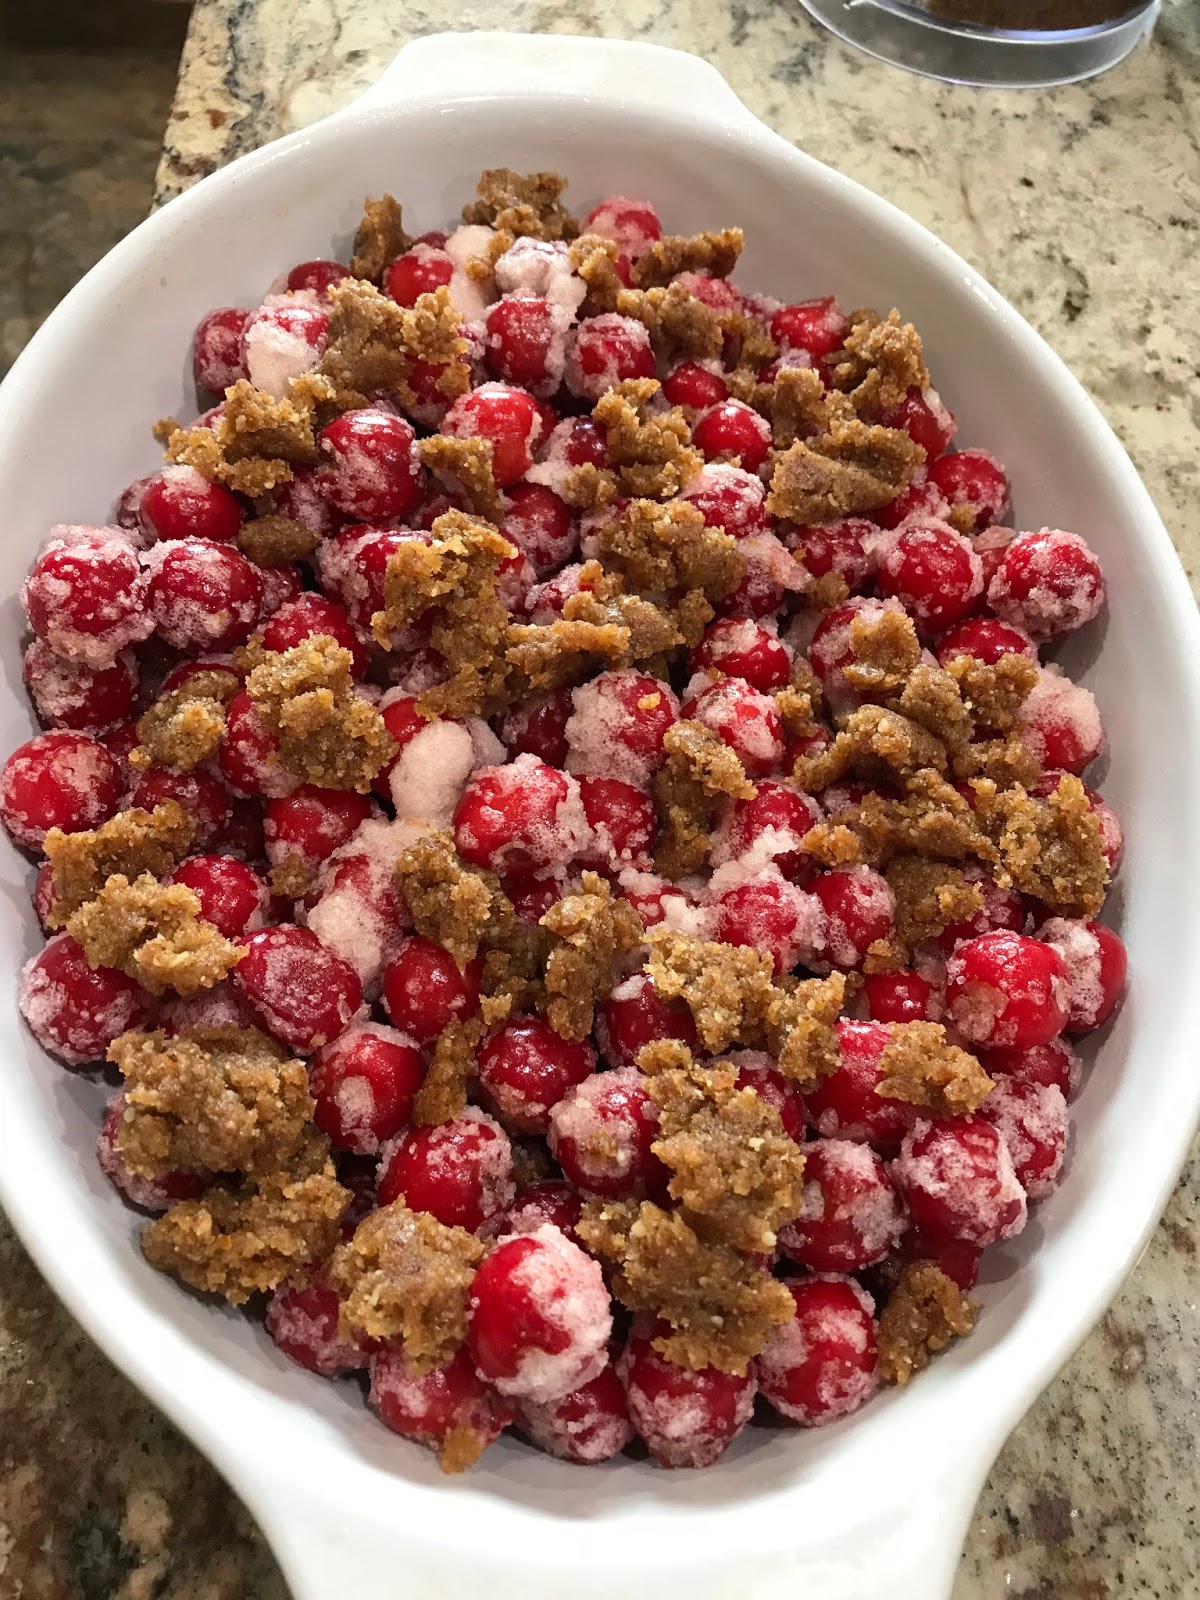
In looking to make a dessert that is somewhat paleo and to use some of the frozen sour cherries from last summer, I decided to make cherry crisp with a different topping than what I have tried before. I combined recipes from previous posts and a topping from paleorunningmomma. The topping is different as it uses mainly dates and walnuts with a small amount of almond flour. The dates provide a nice sweetness to the topping.

For sugar in the filling, I used erythritol which is a natural sweetener and has a low glycemic index. I used tapioca starch in the filling as the cherries were frozen and I know they would have a lot of juice once thawed. After baking it, I should have added more tapioca starch than two and a half tablespoons. I would have preferred it to have less juice once baked. I had both pecans and walnuts in the pantry and decided to use walnuts. 

This recipe is a nice change from an almond flour based topping. 

Starting to add the topping.

Crisp covered with topping and ready to bake.

Cooling off after baking.

DIRECTIONS:

Filling:

4 cups of fresh or frozen pitted cherries
¼ cup white sugar or splenda
¼ cup brown sugar
2 tsp almond extract
1/8 tsp salt
2 ½ tbsp ground almond flour or tapioca starch

Topping:

1 cup pitted dates softened*
1 cup raw walnuts or pecans
1/3 cup almond flour
1/2 tsp pure vanilla extract

DIRECTIONS:

  1. Preheat your oven to 350 degrees F.
  2. To make the topping, combine the softened dates, walnuts, almond flour and vanilla in a food processor and process on high until a crumbly paste forms.
  3. Place the cherries in a large bowl and add the sugar, almond extract, salt and almond flour or tapioca starch. Combine well.
  4. Grease a 1.5 quart baking dish and add the filling mixture. 
  5. Generously sprinkle the crumb topping over the berries using the entire mixture.
  6. Cover the top with aluminum foil and bake in the preheated oven for 20 to 25 minutes, remove the aluminum foil and continue to bake another 15 to 20 minutes until the fruit is hot and bubbly and the top begins to brown and turn crispy. If using frozen cherries, you will have to gauge the time as it might need more time to bake. I baked it for about 50 minutes.
  7. Remove from oven, allow to cool and serve warm. Store leftovers covered in the refrigerator. 
  8. Serves 6 to 8 depending on appetites. 

Recipe Notes
*To soften the dates, soak them in a small amount of hot water for one to two minutes, then drain.


Recipe is a combination of ones already posted on this blog and paleorunningmomma for the topping.

Monday, April 30, 2018

RED LENTIL CARROT SOUP


Even though the warmer weather has started, I still like to make soup for lunches. This lentil carrot soup has a wonderful flavour with curry powder and ginger added to it. One could have also added cumin to the soup but I didn't. The apple adds some sweetness to the taste. I used fresh ginger as I have some on hand. I didn't add any parsley or cilantro as a garnish based on pure laziness. I added a can of light coconut milk. 

The soup is lighter in colour than how it looks in the photo. The soup was so good the DH had two bowls. 

INGREDIENTS:

1-2 tbsp olive oil
1 medium onion, chopped
1 tbsp curry powder
1 tbsp fresh minced ginger or 1 tsp powdered dry ginger
1 cup red lentils, rinsed
2 large size carrots, peeled, chopped
2 stalks celery, chopped
1 apple, peeled, cored, chopped
5 - 6 cups vegetable or chicken broth
salt and pepper to taste

1 cup of coconut or almond milk
chopped parsley or cilantro as a garnish 

DRIECTIONS:

Using the Stove:
Heat the oil in a soup pot to high on the stove. Add the onions, reduce the heat to medium and sauté for five minutes. Stir the onions so that they don't stick or burn. 

Add the curry powder and ginger and sauté for another minute and stir. Add the rest of the ingredients except the coconut milk.  

Cover the pot with a lid and heat to high. Once it boils, reduce the heat to low or simmer and cook for 45 to 60 minutes until all of the vegetables are soft and the lentils are cooked.

Using an immersion blender puree the soup. You can also transfer the soup to a regular blender and puree it. If doing that you can add it back to the pot once pureed. Add the coconut milk, stir and add more salt and or pepper to taste. Garnish the soup bowls with parsley or cilantro. Serves five to six.

Using the Electric Pressure Cooker: 

Choose the sauté feature (high) on the electric pressure cooker. Add the oil and once it is hot, add the onions and sauté for five minutes. Stir the onions so that they don't stick or burn. 

Add the curry powder and ginger and sauté for another minute and stir. Cancel/stop the sauté feature. 

Add the rest of the ingredients except the coconut milk. Close the lid of the pressure cooker, select the pressure cooker button and cook for 15 minutes on medium high. I like to cook soups with beans for at least 15 minutes. Some cooks use less time. I choose automatic pressure release instead of manual. If using a manual release where it vents gradually, you could probably cook it for closer to 10 minutes than 15. 

Once the pressure is released, open the lid and stir the soup. Using an immersion blender, puree the soup. You can also transfer the soup to a regular blender and puree it. If doing that you can add it back to the pot once pureed. Add the coconut milk, stir and add more salt and or pepper to taste. Garnish the soup bowls with parsley or cilantro. Serves five to six.

Modified from kitchen treaty.com

Friday, April 20, 2018

PALEO POPPY SEED LEMON LOAF

Recently I bought a cookbook called "The Plant Paradox" by Steven Gundry. It has a number of interesting recipes. All of the recipes are gut friendly and lectin-free. The cookbook includes some great looking food and includes a variety of different foods. This recipe is from the cookbook.

This poppy seed loaf looked good and the DH asked if I would make this recipe. One ingredient that I hadn't used before is erythritol. It is a natural sweetener and doesn't spike your blood sugar. You can bake with it. It is sometimes sold under the brand name Swerve. I bought the sweetener just as erythritol and found it at the local health food store. Instead of using a loaf pan I used a round cake pan. For the lemon juice and zest I did something a bit different. Last fall I had a large bag of lemons which were not getting used and I didn't want to let them spoil. I grated the lemons to get the zest and combined the zest with the pulp of the lemons in the food processor. I pureed it and froze the mixture in ice cube trays. Once they froze I transferred them to a freezer bag. I have been using these frozen lemon cubes in recipes that call for juice and zest.

The loaf turned out fine and tastes good. Using almond flour and coconut flour creates a different texture to the loaf than using wheat flour but it holds together and is a good alternative to wheat flour.

Batter in the cake pan ready to go into the oven.

Just out of the oven.

Ready to sample.

Another angle to see the loaf slice.


INGREDIENTS:

1.5 cups almond flour
1/4 cup coconut flour
1/2 tsp salt
1 tsp baking soda

3 eggs
1/2 cup erythritol or Swerve (brand name)
1/4 cup avocado oil
juice from 3 lemons
zest of 2 lemons
1/4 cup unsweetened coconut milk
1 tsp vanilla extract
2 tbsp poppy seeds

DIRECTIONS:

1. Preheat the oven to 350 degrees F. 
2. Line a loaf pan with parchment paper.
3. In a large mixing bowl, mix together the flours, salt and soda.
4. In a separate smaller bowl, whisk the eggs and then add the erythritol, lemon juice and zest, coconut milk and vanilla extract. Whisk the wet ingredients and combine well.
5. Add the wet ingredients into the dry ingredients and combine well.  Fold in the poppy seeds. 
6. Transfer to the lined loaf pan and bake for 35 to 40 minutes or until a toothpick inserted into the middle of the loaf comes out clean.
7. Let cool for a few minutes before removing the loaf to a cooling rack. It can be served warm or at room temperature. Makes 6 to 8 servings.